Use dog clippers with guard by choosing the right guard, grooming clean, and trimming in slow, even passes.
If you want a neat, safer home groom, learning how to use dog clippers with guard is the smartest place to start. I’ve found that most clipping mistakes come from rushing, using the wrong guard length, or working on a dirty coat. With the right prep and a calm approach, you can get a smooth result that looks professional without stressing your dog.

What dog clippers with a guard actually do
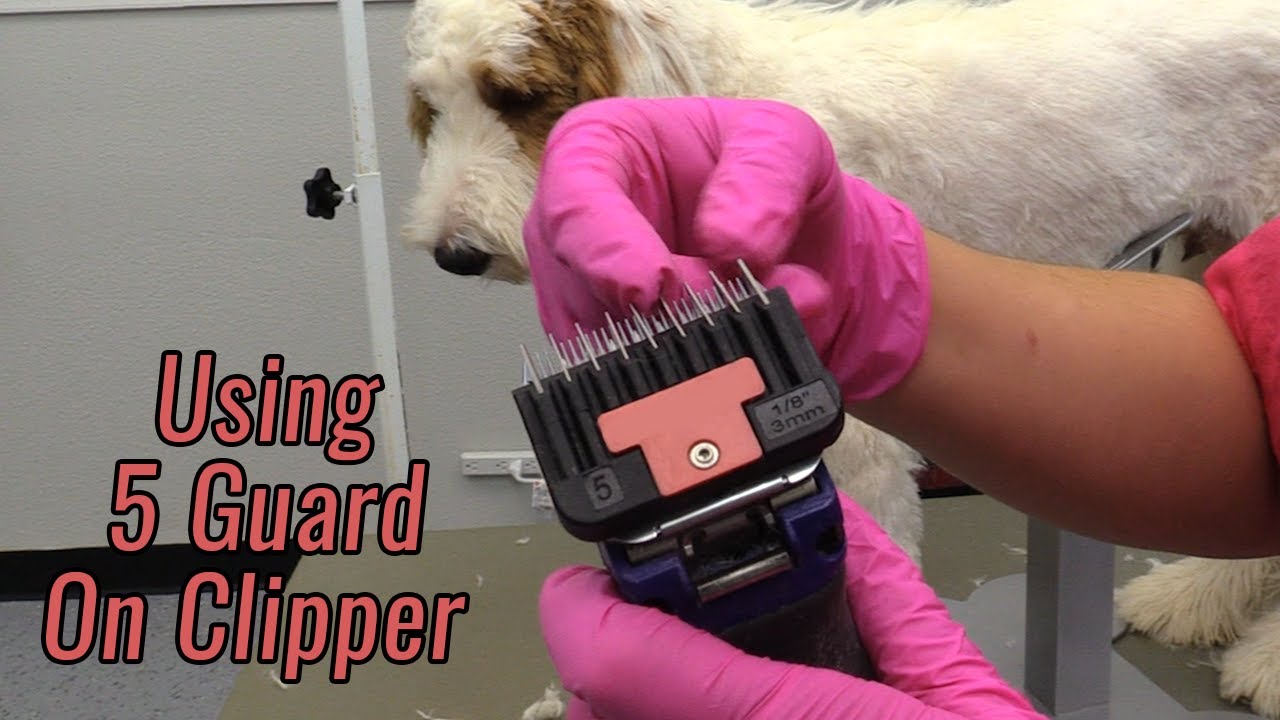
Dog clippers with a guard are clippers fitted with a comb attachment that sets the cutting length. The guard helps keep the blade from cutting too close, which makes grooming safer and more predictable. It also helps you keep a more even coat length, especially if your dog has a fluffy or uneven coat.
In simple terms, the guard acts like a guide rail. It glides through the coat and leaves behind a set amount of hair. That makes it easier for beginners and much more forgiving on wiggly dogs.
A few things to know before you start:
- The smaller the guard number, the shorter the cut in most systems.
- A guard does not replace good technique.
- Coat type matters a lot, because thick or matted hair can block the clipper.

How to use dog clippers with guard step by step
Using dog clippers with guard is not hard, but it works best when you move slowly and stay organized. I always tell people to treat grooming like mowing a lawn, not shaving a face. Short, steady passes beat fast, choppy movement every time.
1. Brush the coat first
Start by removing tangles, loose hair, and dirt. Clippers do not work well on mats, and mats can pull the skin. If I skip this step, I can feel the clipper tug, and the dog usually notices right away.
Use:
- A slicker brush for fluffy coats
- A comb for checking hidden knots
- A mat splitter only if needed, and with care
2. Bathe and fully dry the dog
Clean, dry hair clips better than dirty or damp hair. Wet coat can clog the blade and make the finish uneven. A dry coat also helps the guard glide instead of dragging.
Make sure the coat is fully dry, especially in:
- Underarms
- Belly areas
- Behind the ears
- Thick leg feathering
3. Pick the right guard length
Choose a guard based on the look you want and your dog’s coat type. Longer guards leave more hair, while shorter guards create a closer trim. If you are unsure, start longer first, since you can always trim more later.
Common choices include:
- Longer guard for a fluffy pet trim
- Medium guard for a tidy body cut
- Shorter guard for warm weather maintenance
4. Test the clipper on a small area
Before doing the full body, test on the side or back. This helps you check blade heat, coat flow, and the final length. I like to test in a low-stress spot first so I can adjust before committing to the whole groom.
5. Clip with the hair growth, then against it if needed
Most of the time, begin by moving with the direction of hair growth. This is gentler and helps the guard move smoothly. If you need a more even finish, you can do a second pass against the grain, but only if your dog is comfortable.
Use light pressure and keep the clipper flat. Do not press hard, because the guard needs room to work.
6. Work in small sections
Break the coat into manageable parts. Clip one section, then move to the next. That keeps your lines cleaner and helps you avoid missed spots.
A simple order can be:
- Back
- Sides
- Chest
- Legs
- Belly
- Rear end
- Face only if your clipper and guard are safe for that area
7. Keep checking the blade and guard
Clippers can heat up fast, especially on thick coats. Stop often and touch the blade area carefully. If it feels hot, pause and let it cool.
You should also brush hair out of the guard during the groom. Hair buildup makes the clipper less effective and can cause uneven cuts.
8. Finish with blending and cleanup
Once the main body is done, check for rough patches. Blend uneven spots with short, gentle passes. Then clean around paws, tail, and sanitary areas with extra care.
A good finish often comes from the last 10 minutes, not the first 10. That is one of the biggest lessons I learned early on.

Choosing the right guard size for your dog
The best guard size depends on coat type, season, and how short you want the trim. There is no single perfect answer for every dog. A guard that works well on a doodle may not work the same way on a terrier or double-coated breed.
Here is a simple way to think about it:
- Longer guards are better for a soft, natural look
- Medium guards are good for general maintenance
- Shorter guards help with very fluffy or overgrown coats
Keep these tips in mind:
- Start longer if you are unsure
- Avoid going too short on sensitive skin
- Be extra careful with double-coated breeds, since very short trims can affect coat function
Breed, coat density, and grooming history all matter. The American Kennel Club and many professional groomers note that coat type should guide grooming choices, not just personal preference.
Best dog clipper technique for a smooth finish
The best technique is slow, steady, and gentle. I know that sounds basic, but basic is what works. Most uneven cuts come from moving too fast or lifting the clipper at the wrong angle.
Use these technique tips:
- Keep the clipper parallel to the body
- Move in straight, overlapping passes
- Hold skin taut in loose areas
- Use the other hand to lift hair gently when needed
- Stop and comb out hair if the guard starts snagging
Try to keep your pace calm. Dogs often mirror our energy, so if you are tense, they may get tense too.
Common mistakes to avoid
I’ve seen a lot of grooming hiccups over the years, and most are easy to prevent. The good news is that once you know the traps, the job gets much easier.
Avoid these common mistakes:
- Using clippers on a matted coat
- Choosing a guard that is too short too soon
- Skipping the bath and dry step
- Pressing the clipper into the skin
- Clipping when the blade is hot
- Trying to finish the whole dog in one rushed session
One mistake I made early on was trying to “fix” a rough patch by pressing harder. That only made the cut worse and irritated the coat. Light passes almost always win.
Safety tips when using dog clippers with guard
Safety matters just as much as style. A guard helps, but it does not make the process risk-free. Dogs have thin skin in some places, and sensitive spots need extra care.
Follow these safety basics:
- Keep blades clean and lubricated
- Check blade temperature often
- Avoid clipping over cuts, rashes, or hot spots
- Be careful around ears, eyes, paw pads, and genital areas
- Use a quiet clipper if your dog is noise-sensitive
- Stop if your dog shows strong fear or pain
If your dog has skin issues, open wounds, or severe matting, a professional groomer or veterinarian may be the safer choice. That is not a failure. It is just good judgment.
How to make dog clipping less stressful for your pet
A calm dog is much easier to groom. The trick is to build trust before the clippers even turn on. In my experience, a 5-minute calm setup can save 20 minutes of wrestling later.
Helpful ways to reduce stress:
- Let your dog sniff the clippers first
- Turn the clippers on nearby before touching the coat
- Give short breaks
- Reward calm behavior with treats
- Keep the session short if your dog is new to grooming
- Groom in a quiet room with good lighting
Think of grooming like teaching. The first few sessions are about comfort, not perfection.
Maintenance for clippers and guards
Clean tools make better cuts. If your clipper is dull, dirty, or clogged, even the best guard will not help much. Proper maintenance also extends the life of your tools.
After each use:
- Remove hair from the blade and guard
- Brush out the attachment
- Oil the blade if the manufacturer recommends it
- Let the blade cool before storing
- Check for bent teeth or wear
A clean clipper cuts more evenly and pulls less. That means a better groom and a happier dog.
When to use dog clippers with guard versus other grooming tools
Dog clippers with guard are great for body trims and maintenance cuts, but they are not the answer for every grooming task. Sometimes scissors, thinning shears, or a pro groomer are the better choice.
Use clippers with guard for:
- Full body trims
- Seasonal coat maintenance
- Regular tidy-ups between grooms
Consider other tools for:
- Detailed face shaping
- Paw pad cleanup
- Very thick mats
- Fine blending in tricky areas
Professional groomers often mix tools for the best result. That blend of tools is one reason salon finishes often look smoother than a single-tool DIY groom.
Frequently Asked Questions of How to use dog clippers with guard
How do I know what guard size to use on my dog?
Start with a longer guard if you are unsure, since it leaves more coat and gives you more control. You can always trim shorter later, but you cannot put hair back once it is cut.
Can I use dog clippers with guard on a matted coat?
It is usually not a good idea. Mats can jam the guard, pull the skin, and make clipping painful, so heavy matting is often best handled by a professional groomer.
Should I clip my dog’s coat wet or dry?
Always clip a fully dry coat unless your tool instructions say otherwise. Wet or damp fur can clog the guard and give you an uneven finish.
Why is my clipper pulling hair even with a guard?
The coat may be tangled, the blade may be dull, or the guard may be clogged with hair. Cleaning the tool, brushing the coat, and oiling the blade often solves the problem.
Can I use dog clippers with guard on my dog’s face?
Only if your clipper is safe for that area and you are very cautious. Many owners use smaller tools or scissors near the face because it is a sensitive spot with limited room for error.
Conclusion
Learning how to use dog clippers with guard is really about patience, prep, and the right technique. If you brush first, choose the proper guard, clip in small sections, and keep the blade cool, you can get a clean result with far less stress. The more you practice, the easier it becomes to read your dog’s coat and your dog’s comfort level.
Start simple, move slowly, and focus on safety over speed. If you want, try these steps on your next grooming session and see how much smoother it feels. For more grooming tips and practical pet care guides, keep exploring and subscribe for updates or leave a comment with your own experience.