Use calm, clean blades, steady angles, and short strokes to safely clip dog legs.
Dog clippers on legs can feel tricky at first, but the job gets much easier when you understand the coat, the bone structure, and the right clipper technique. I’ve found that most leg grooming problems come from rushing, using the wrong blade, or trying to force the hair to lie flat. In this guide, I’ll walk you through how to use dog clippers on legs with the same practical approach groomers use every day, so you can get a neat finish without stressing your dog.

Why dog leg grooming takes extra care
Legs are one of the easiest places to nick, snag, or leave an uneven finish. The skin is often thinner around the ankles, the bone is close to the surface, and the hair can grow in different directions. That means dog clippers on legs need a gentler touch than body clipping.
A dog’s legs also move a lot. Even a patient dog may shift weight, lift a paw, or twitch when you reach the lower leg. That’s why good control matters more than speed. Think of it like trimming around a delicate seam on fabric. A slow hand gives a better result than a fast one.
Legs can also hide mats, tangles, burrs, and dirt. If you clip over a mat, you can pull the skin and make the clipper grab. So before you even turn the clippers on, you need to prepare the coat the right way.
What you need before using dog clippers on legs
A smooth leg trim starts with the right tools. I always tell people that preparation does half the grooming for you. When the tools are ready, the process feels calmer for both you and your dog.
Here’s a simple grooming setup:
- Dog clippers with a quiet motor
- A clean blade in the right length
- Clipper oil
- A slicker brush
- A metal comb
- Grooming scissors for small touch-ups
- A towel
- Treats for reward and calm handling
- A non-slip surface like a grooming table mat or bath mat
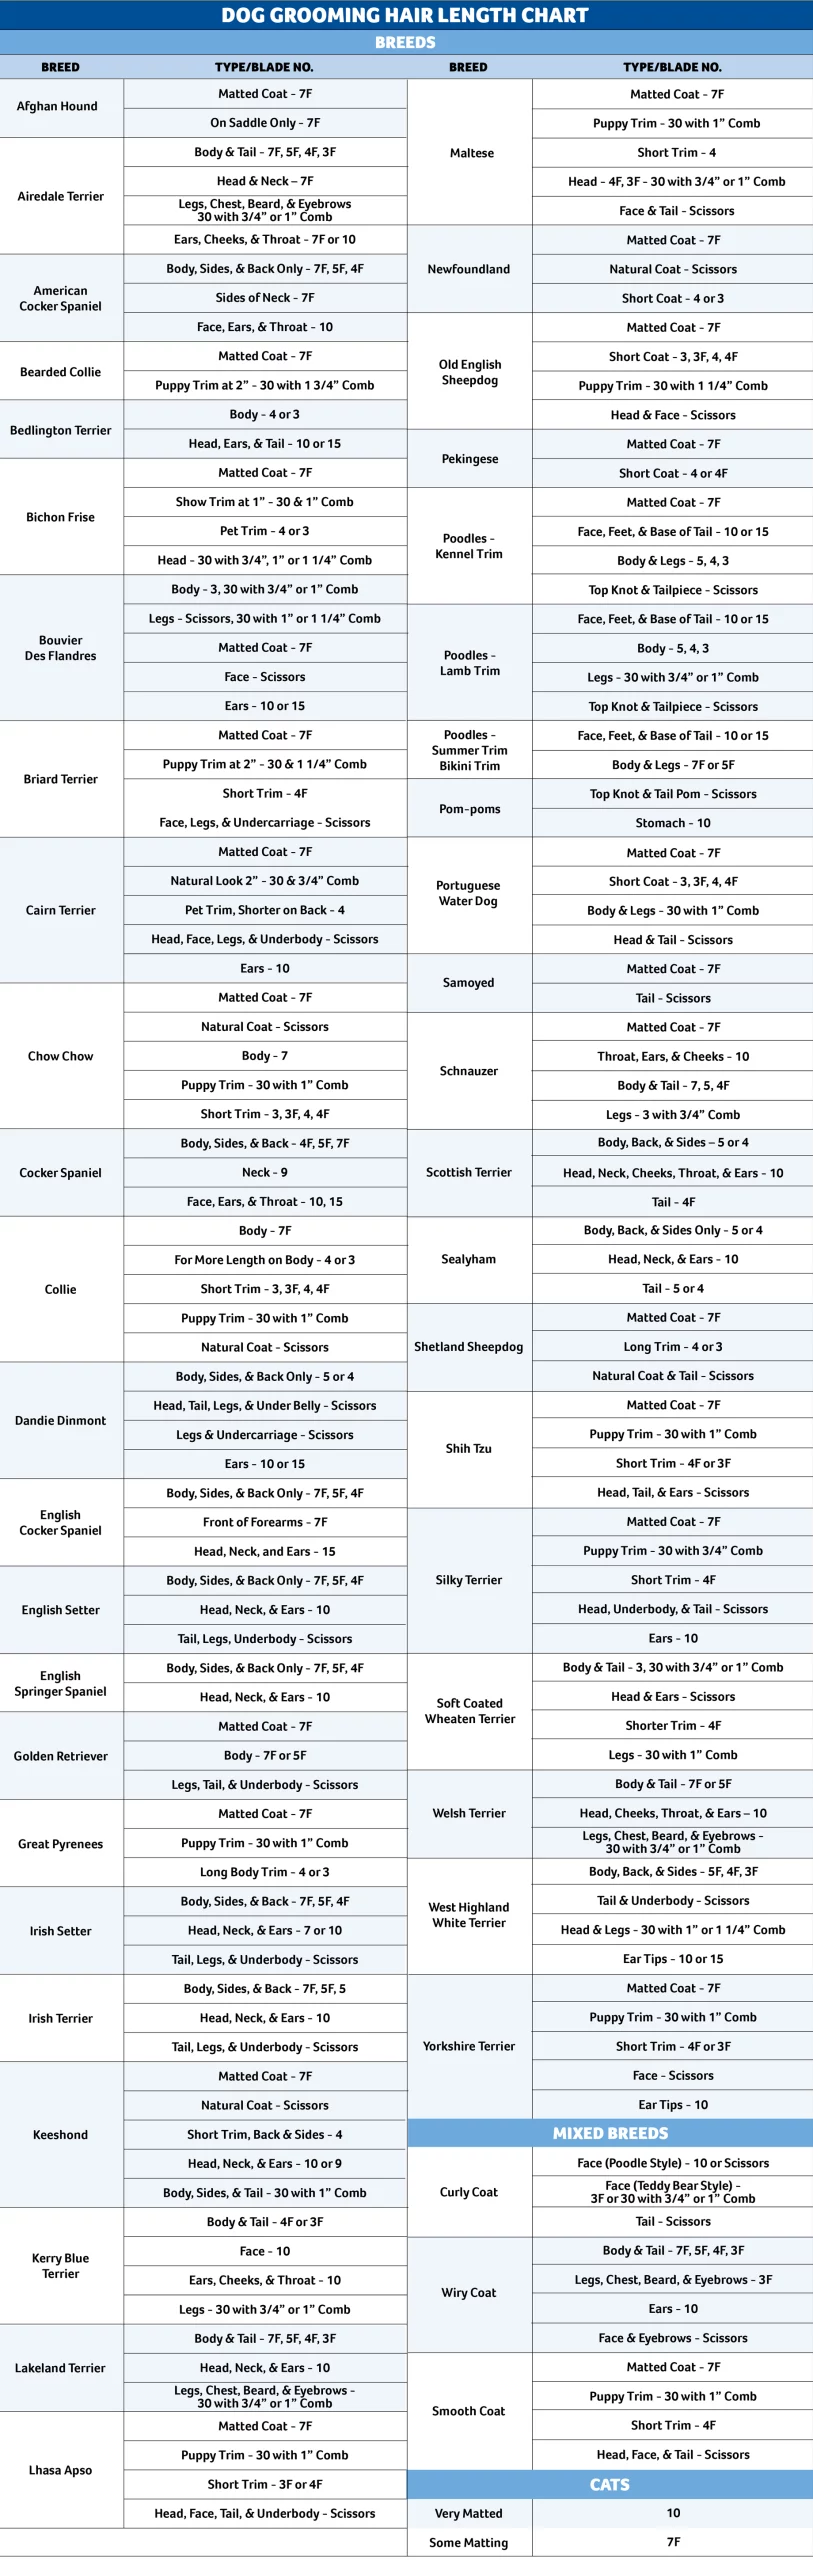
Blade choice matters a lot. For most pet trims, a longer blade or guard comb gives a softer, safer look on legs. Shorter blades can work, but they show lines more easily and can make the legs look too bare if you are not careful.
If your dog has curly or thick hair, you may need to brush and comb longer than you expect. If the coat is fine, a shorter prep time may be enough. Either way, the coat should be clean, dry, and free of knots before clipping.
How to prepare your dog’s legs for clipping
Good prep makes using dog clippers on legs much easier. I learned this early on after trying to clip a slightly damp leg on a doodle mix. The clipper started to drag, and the finish looked rough. Since then, I never skip prep.
Follow these steps:
- Brush the leg from top to bottom.
- Use a comb to check for hidden tangles near the ankles, behind the knees, and around the feathers.
- Remove mats gently before clipping. If a mat is tight, cut it out carefully or ask a pro.
- Wash and dry the coat if it is dirty or oily.
- Make sure the dog is standing on a stable surface.
- Let the dog relax for a minute before you start.
Pay close attention to these common trouble spots:
- Behind the elbows
- Around the hocks
- On the front of the wrists
- Between the paw and the lower leg
- Around feathering on long-coated breeds
The cleaner the coat, the smoother the clipper work. Dirt and grit can dull blades fast and make the clipper pull.
How to use dog clippers on legs step by step
Using dog clippers on legs is not about pressing hard and hoping for the best. It is about using light passes and keeping the blade moving in the direction that matches the coat and the shape of the leg. This helps you avoid clipper marks and protects sensitive skin.
Step 1: Start with the calmest leg
Pick the leg your dog handles best. Many dogs are more comfortable starting with the front legs. Others do better with the back legs because the front paws are more sensitive. Use the leg where your dog seems least fussy.
Keep your voice relaxed. Short praise helps more than loud excitement. If your dog is nervous, take a break and come back after a few treats.
Step 2: Hold the leg naturally
Do not twist the leg into an awkward angle. Support it in a way that feels normal for the dog. A bent joint or stretched paw can make your dog tense up fast.
The goal is gentle control, not force. If the dog resists, reset and try again from a different angle. A relaxed leg is much easier to clip evenly.
Step 3: Clip with the hair growth when possible
Move the clippers in smooth, short strokes. On many legs, clipping with the direction of hair growth gives a softer, safer finish. Against the grain can leave a closer cut, but it also raises the risk of irritation and uneven lines.
Use small overlapping passes. Think of mowing a tiny lawn one quiet row at a time. That steady pattern helps the blade stay even.
Step 4: Keep the blade flat and light
Do not dig the blade into the leg. Let the clipper skim across the coat. If you press too hard, you can irritate the skin or create a choppy look.
On curved areas like the front of the leg or the hock, tilt your wrist slightly to follow the shape. This helps the blade stay in contact without gouging the coat.
Step 5: Check your work often
Stop every few passes and look at the leg from a few angles. Hair can look even from one side and patchy from another. A quick comb-through can reveal missed spots.
Watch for:
- Lines
- Patches left too long
- Hair sticking out at the ankles
- Redness or skin irritation
- Signs your dog is getting tired or worried
Small corrections are easier than fixing a full bad trim later.
Step 6: Finish the feet and lower legs carefully
The area around the paw is where many people get nervous, and for good reason. Skin is close, and dogs tend to pull their feet away. Use slower strokes and stay aware of where your free hand is.
If the paw hair is heavy, you can trim around the outline with scissors after clipping the leg. That often gives a cleaner, rounder look with less risk. I’ve found this works especially well on dogs with fluffy feet and narrow ankles.
Best clipper technique for front legs
Front legs are usually easier to see, but they can still be tricky because of the elbow and wrist joints. The coat may also grow in a different pattern on the outside and inside of the leg.
Here’s what helps:
- Start above the elbow and work downward.
- Keep the leg in a natural standing position when possible.
- Use short, gentle passes on the front and sides.
- Watch the inside of the leg for loose skin and folds.
- Use a comb to lift the hair if the coat is dense.
If the front leg has a rounded shape, follow that curve instead of trying to make it look flat. Natural shape looks better than an overworked trim.
Best clipper technique for back legs
Back legs often need extra patience because the hock area is bony and the dog may shift weight while you work. Some dogs also get more sensitive about their back feet being handled.
Try this:
- Support the leg without pulling it too far back.
- Clip the thigh first, then move toward the lower leg.
- Use extra care around the hock joint.
- Keep the blade moving so it does not heat up on one spot.
- Stop if the dog starts tensing the hip or kicking.
Back legs can look uneven fast if you rush. A slow, balanced approach usually gives the best result.
Common mistakes when using dog clippers on legs
I’ve seen the same mistakes again and again, both in home grooming and in beginner setups. The good news is that they are easy to avoid once you know what to watch for.
Common mistakes include:
- Clipping dirty or damp hair
- Using a dull blade
- Trying to force mats out with the clippers
- Holding the leg too tightly
- Pressing the clipper into the skin
- Skipping combing between passes
- Moving too fast and missing uneven patches
- Using the wrong blade length for the coat type
One of the biggest mistakes is expecting one pass to do everything. Leg grooming is more like sketching than painting a wall. You build the shape little by little.
How to choose the right blade or guard comb
Blade choice affects both safety and style. A shorter blade cuts closer and can make the leg look neat, but it also leaves less room for error. A longer blade or guard comb leaves a softer finish and is often better for pet trims.
Here is a simple way to think about it:
- Short blades: closer finish, more precise, higher risk on sensitive skin
- Longer blades: softer finish, safer feel, better for natural-looking legs
- Guard combs: good for blending and keeping length on fluffy coats
For most at-home grooming, a longer option is the safer place to start. If you are unsure, test on a small area first and check the result before doing the whole leg.
How to avoid clipper burn and skin irritation
Clipper burn is no fun for dogs. It can leave the skin red, hot, or itchy. It usually happens when the blade is dull, too hot, dirty, or used with too much pressure.
To reduce the risk:
- Oil the blade often
- Clean hair from the blade during grooming
- Let the blade cool if it feels hot
- Avoid repeated passes in one spot
- Never clip over irritated skin
- Stop if your dog flinches or scratches the area
A clipper that feels warm to your hand may feel much hotter to your dog. I always test the blade against my wrist before going back to the leg.
Breed and coat differences you should know
Not all legs are groomed the same way. Coat type changes the technique, the blade choice, and the amount of finishing work.
Examples:
- Poodles and doodles: curly coats need careful brushing and often show clipper lines if rushed
- Spaniels: feathered legs often look best with a softer, blended trim
- Shih Tzus and similar breeds: legs can need scissoring after clipping for a rounded look
- Short-coated breeds: usually need only light shaping or tidying, not full clipping
The dog’s build matters too. A thick, round leg needs a different approach than a narrow, fine-boned leg. There is no one-size-fits-all method.
When to use scissors instead of clippers
Sometimes scissors are the better tool. If the hair is very fine, if the dog hates clipper vibration, or if you only need to tidy the lower leg, scissors can be safer and more precise.
Scissors help with:
- Blending clipper lines
- Shaping the feet
- Cleaning up feathering
- Trimming stray hairs around joints
- Softening a clipper finish
I often use clippers for the main shape and scissors for the final polish. That mix gives a cleaner look without making the leg too severe.
Safety tips for clipping dog legs at home
Dog leg grooming should always be calm and low-risk. Safety comes before style every time.
Keep these habits in mind:
- Never clip a wet or dirty coat
- Keep one hand ready to steady the leg
- Do not clip near wounds, rashes, or hot spots
- Work in good light
- Keep the dog on a non-slip surface
- Reward calm behavior often
- Stop if the dog becomes scared or restless
If your dog has arthritis, tremors, or a past grooming injury, go slower than usual. Comfort matters more than a perfect finish.
When to ask a professional groomer for help
Some jobs are better left to a professional. That is not a failure. It is simply smart grooming.
Get help if:
- The coat is badly matted
- Your dog is highly reactive or fearful
- The legs are swollen, sore, or injured
- You cannot safely hold the leg in place
- The coat is very thick and hard to blend
- You want a breed-specific finish and are not confident yet
A good groomer can also show you how to use dog clippers on legs with your dog’s specific coat type. That one-on-one guidance can save a lot of stress.
Frequently Asked Questions of How to use dog clippers on legs
What is the safest way to use dog clippers on legs?
The safest way is to start with a clean, dry coat, use a quiet clipper, and work in short, gentle strokes. Keep the blade flat and avoid pressing into the skin.
Should I clip dog legs with or against the hair growth?
In most cases, clipping with the hair growth is safer and gives a smoother finish. Against the grain can leave a closer cut, but it also increases the chance of irritation and clipper marks.
Why do dog clippers pull on my dog’s legs?
Clippers often pull when the blade is dull, the coat is dirty, or there are tangles in the hair. A freshly brushed and dry coat usually makes the clipper glide much better.
Can I use the same blade on the body and legs?
Yes, but the legs may need a different approach because the skin is more delicate and the shape is more curved. Many groomers use a longer setting on legs for a softer, more natural finish.
How do I stop my dog from moving while clipping legs?
Use a calm voice, short sessions, and treats. If your dog still moves a lot, pause often and work on one leg at a time instead of trying to finish everything in one go.
Conclusion
Learning how to use dog clippers on legs gets much easier when you slow down, prep the coat well, and work with the leg’s natural shape. Clean hair, the right blade, and light passes will give you a safer and more even result. Most of all, patience pays off, because a calm dog and a careful hand make grooming feel a lot less stressful.
If you take anything from this guide, let it be this: go slowly, check your work often, and keep your dog’s comfort first. If you want, save this guide for your next grooming session, explore more coat-care tips, or leave a comment with your biggest clipping challenge.